Collect from existing form
Learn how to integrate a Right Consents Collect Form in an existing HTML Form that handle personal information.
- Start a local docker image to host an HTML Form for collecting personal information
- Define specific processing and preferences for the collected data in the Right Consent Backoffice
- Test the consent form generated until desired result
- Integrate Javascript SDK in the HTML Form
- Consult and export collected consents
Prerequisites
To complete this guide you need:
- Roughly 30 minutes
- Git
- Docker
- Right Consents running
Right Consents Community is designed to be integrated in digital solutions, but if you are not a developer, you can still use the back office to collect consents manually.
Overview
In this guide you will learn how to use the SDK to integrate Consent Collect in an existing online HTML Form.
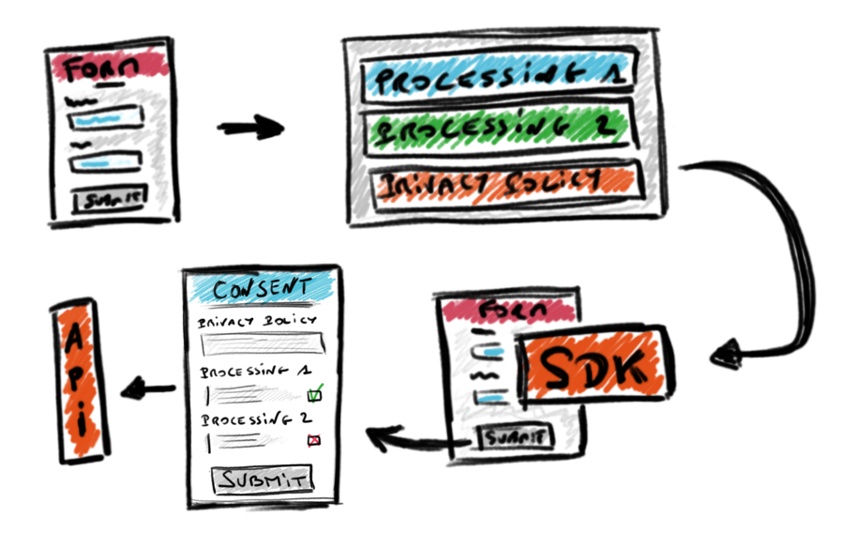
This guide also covers some basic aspects of consent form building for some desired processing and preferences.
SDK integration guide
Create the models
First, define the processings, preferences or terms and conditions you want to use. The terms and conditions body supports HTML, but plain text will work just fine.
You will also need to create an information model, especially if you intend to use processings.
You can create an email model if you want to send a consent receipt to your users. This is not mandatory. Again, some fields support HTML as well as plain text.
If you are well-versed in CSS, you can play with a theme model to customize your form's look'n'feel, otherwise the default theme will be applied. Even if CSS is a mystery for you, don't hesitate to create a theme simply to register your own logo which will appear in your forms, receipts and emails.
Don't forget to activate each model!
Create an HTML From
The basic use case here, is collecting the consent from users before collecting their data.
We need an HTML form to plug the SDK to it, so either take an existing one from your personal project, or follow along with a basic HTML form.
This HTML form can be served using docker or docker-compose
$ docker run --name apache -v /path/to/consent-example:/app bitnami/apache:latest -p 1180:1180
or
$ docker-compose up -d
Once the docker container up and running, go to this page.
Integrate Javascript SDK in the HTML Form
At this point you have a simple HTML form, with some input elements that can be filled with personal data, for example.
The next step is to connect this form to the SDK and the ConsentCollector. It will create a consent
form based on a subject ID (basically a phone number, an email address ...), and a consent context.
You will need, first, to import the script file in your HTML file like so:
<!-- With consent.js stored locally -->
<script src="/path/to/consent.js"></script>

<!-- With consent.js from Fair&Smart CDN -->
<script src="https://assets.fairandsmart.tech/consent.js"></script>
More on the SDK configuration and integration here.
Then, write a function that calls the Consent Collector. This function has to declare a
new FairAndSmart.ConsentCollector instance and call the collect()
method from the ConsentCollector object:
 function collect() {

    /** Page is awaiting the response from the consent window: disabling submit button **/
    const submitBtnElement = document.getElementById('submit');
    const formElement = document.getElementById('demo-form');
    const message = document.getElementById('message');
    const subject = document.getElementById('input-email').value;

    submitBtnElement.setAttribute('disabled', 'true');

    /** Collect objet creation */
    const consentCollector = new FairAndSmart.ConsentCollector({
        tokenBrokerEndpoint: 'http://localhost:3001/profile/form',
        consentContext: {
            subject: subject,
            author: subject,
            origin: "WEBFORM",
            confirmation: "NONE",
            language: "en",
            userinfos: {},
            validity: "P6M",
            layout: "layout.001"
        },
        mode: 'window'
    });

    /** Consent collection can begin **/
    consentCollector.collect()
        .then(() => {
            /** Sucess callback: collect is done */
            submitBtnElement.classList.add('hidden');
            formElement.classList.add('hidden');
            message.classList.remove('hidden');
            /** We can check the collect reponse here */

        })
        .catch((err) => {
            /** Error callback, something went wrong. Reset button to retry the consent collect */
            console.error(err);
            submitBtnElement.setAttribute('disabled', 'false');
        })
}
Finally, create a button in your HTML Form that will call the function collect():
<button id="submit" class="submit-btn" onclick="collect()">Send</button>
Test, validate and generate a consent
Once everything is set up, you are ready to test the consent collection.
Go to the following web page, fill the form and click on the submit button at the bottom of the page.
A popup window will appear with the desired consent form. Submit your preferences, processings and/or terms and conditions of your choice by clicking on the submit button.
Done, you have attached a consent collector to an existing HTML form. Moreover, you have created a consent record that can be accessible from the backoffice.
Consult collected consents via the back-office
The final step, in order to access consents records created using the form, go to the GUI / Back Office under the page Integration > Search.
Here, you can access the consent records generated by users and filter them by entry and value entry like so:
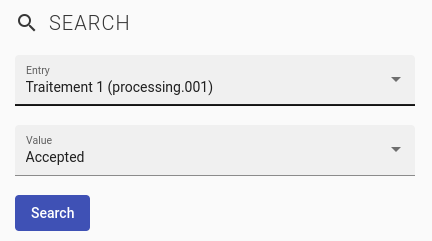
Then click on search, a list of consent will be displayed on a table.
From here you can export all the consent records generated by clicking on the export button:
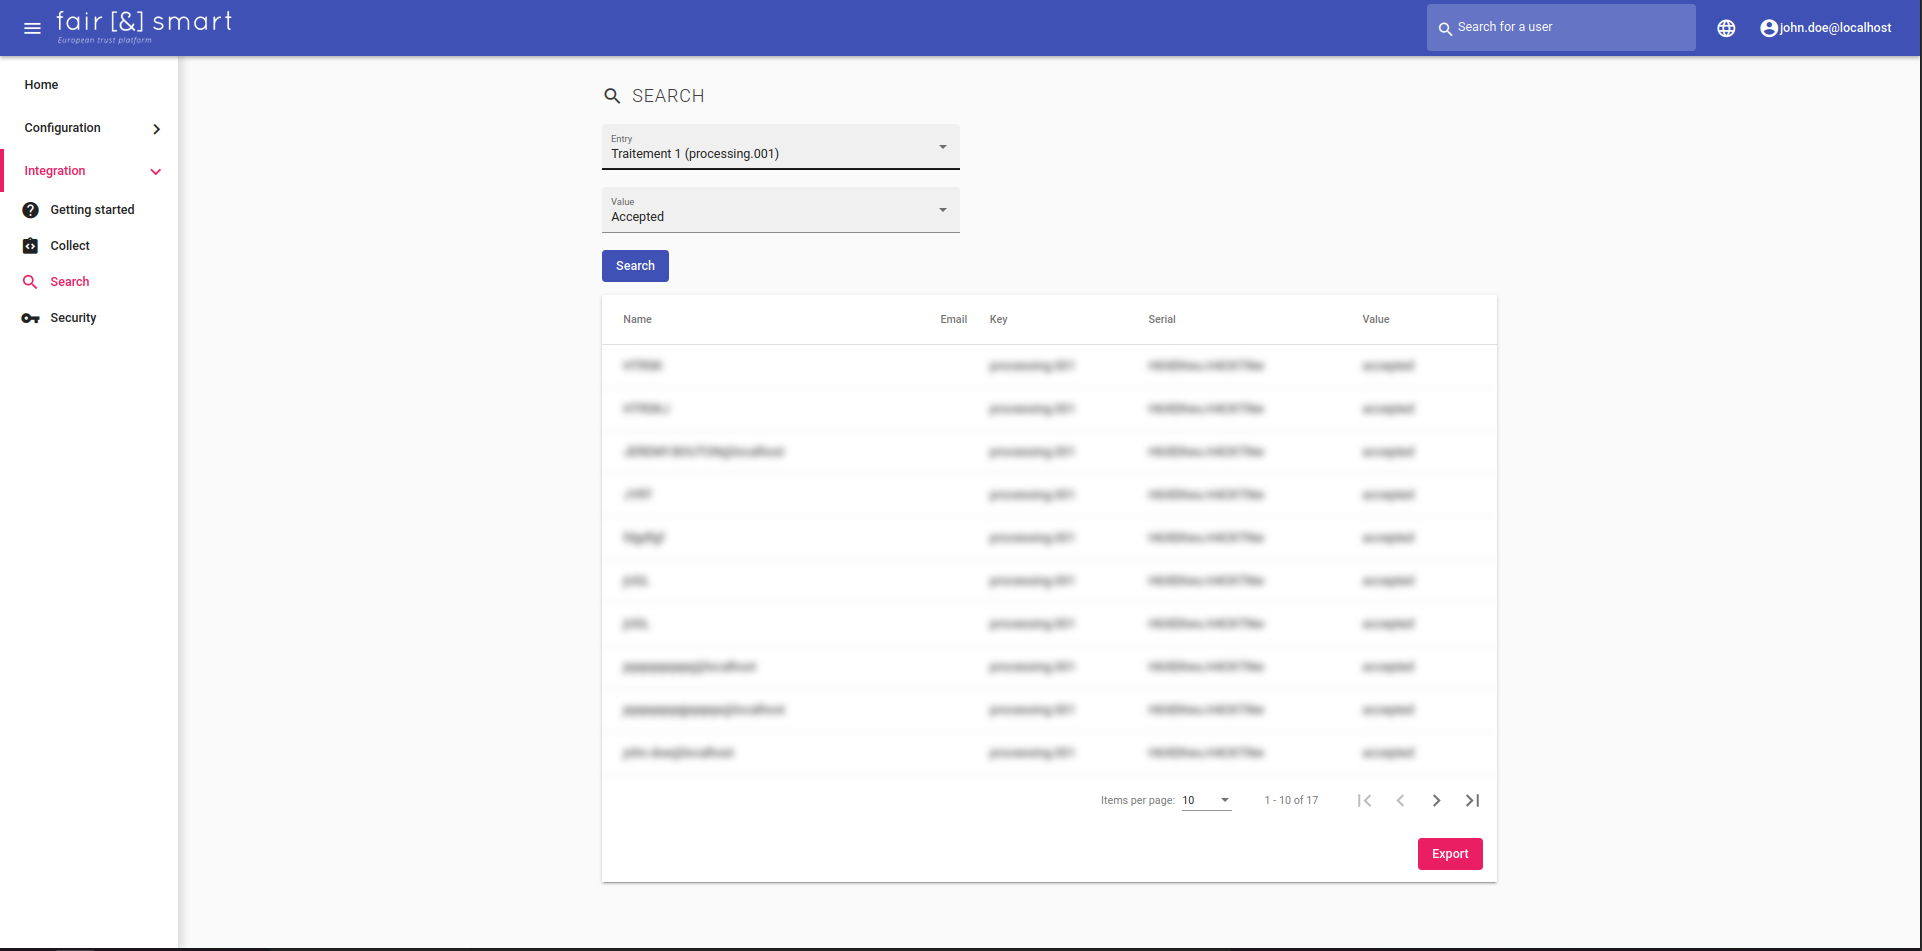
A .CSV file will be created, containing all the information linked to the user consent record (Record key, Record value, Email Address...).